Wednesday, February 18, 2009

Tagging and Uploading Photos: Introducing Flickr

Flickr is an online photo and video management application, used for editing, organising and uploading digital images online. It was developed by Ludicorp, a Vancouver-based company that launched this application in February 2004. In 2005, both Flickr and Ludicorp were acquired by Yahoo! Flickr has since undergone many changes in both appearance and interface. The latest version (Flickr Gamma) was launched in May 2006.

Flickr requires a Yahoo! account to sign in, and it’s a free and easy way to share photos with friends. When logging onto the website, you will be prompted to sign in with your Yahoo ID, or, alternatively, create a new Yahoo e-mail account to be able to log onto Flickr.


Upon loading, you will be greeted with your own personal Flickr page. There are also various upload choices available, both for beginners and for more advanced users. One can upload:
  • via the Flickr Uploader (available for both PC and Mac);
  • via iPhoto, Aperture, or Windows XP plug-ins;
  • via Flickr upload web page;
  • via email via various free third-party desktop programs;

Uploading Photos (through Flickr Uploader)

The easiest way to upload photos in Flickr is through its very own Flash uploader. When you sign in, you will see your Photostream on the top right hand side of the screen, and the Upload link on the top left. Click on Upload to start uploading your pictures in 3 simple steps: first choose your photos, then upload, and finally edit them. (After uploading, you will be able too see them in your Photostream – see above). When uploading, remember that you can decide who will see your photos: you can either make them public (can be viewed by anyone logging onto Flickr) or private (viewable only to those you choose).


Problems with uploading?

At times, you may not be able to work with Flickr’s flash uploader. This can happen for a variety of reasons: the most common being that you do not have the required flash plug-in or your Internet browsing security settings are set too high. If you do not wish or cannot rectify this, click on the basic uploader link which will let you upload your pictures in much the same way as you would send an attachment in an e-mail. Slow, but does the trick.

Tagging your photos

Once your photos are online, you may wish to tag them. Tagging a photo means giving it a sort of label or short description, so that you or other persons may be able to search for the photo more efficiently. To tag a photo, simply select a photo in your Photostream and click on Add a Tag (on the right hand side of the screen; just underneath your photo’s thumbnail.)

While up to this point, this process is similar to other tagging features available on other photo management applications, Flickr can then take tagging into a whole new level: it lets you select parts of the photo and tag different parts of it with different words. For example, if you upload a photo of a street lined with houses, you would be able to tag each individual house and perhaps input the name of the family who inhabits it. The same goes for group photos: Flickr lets you pin-point the individuals in the picture, one by one.


With Flickr, tagging becomes a visual process: the tagged parts of the photo will be encircled and the tags clearly visible on different parts of the picture, creating interesting compositions. This is known as adding notes. To add a note to an uploaded picture, simply click on the photo you wish to tag, and click on Add Note. You can drag the note around the required position on the photo, and you may also delete or edit it at a later stage.

Editing your photos

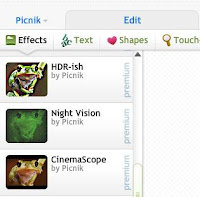
In 2007, Yahoo! announced its partnership with Picnik, a web-based photo editing application, and it was integrated into Flickr. By clicking on the Edit Photo tab, Picnik will open and allow the user to access its editing features. These include:

Basic editing: Lets you perform basic fixes to your photos, such as rotating, cropping and sharpening of a photo. Click on the Edit Tab;
Basic effects: Allows you add simple effects, such as Black and White, Sepia, Colour Invert, Tint, etc. Click on the Create Tab and then on Effects;
Add Frames: Lets you add novelty frames to your photos. Click on the Create Tab and then on the Frames Tab;
Advanced effects
: More advanced special effects, created by clicking on the Create Tab and then on Sandbox Tab.

Viewing your photos and sharing them with others

After you have tagged and edited your photos, you may wish to share them with your friends. First, click on the View as Slideshow icon in your Photostream, to see how your pictures will look on your friend’s PCs. Then, if you are happy with the results, click on the share icon (either in your Photostream or, if you are in Slideshow mode, it will prompt you to e-mail your photos to your friends at the end of the show). Basically, what your friends will receive is a link to your Photostream. Add your friends’ e-mail addresses (separated by a comma) or just copy and paste the link and use your regular e-mail account to send the link over.

For more information about Flickr and its many uses, click on the following links:

http://flickr.com
http://www.picnik.com/
www.flickr.com/help/
http://en.wikipedia.org/wiki/Flickr

Monday, February 9, 2009

Avatars

What is an Avatar?
An avatar is a graphical representation of oneself, or, in other words, a picture which represents the user. It can be similar in appearance to the user who created it; or it could be totally different, like an 'alter ego' of oneself. Avatars can be static or animated.

In Hindi, the word Avatar means...

"...the descent of a deity to the earth, in an incarnate form,
or some manifest shape..."

Most commonly, Avatars are used in Internet forums, social networking sites (such as Facebook or MySpace) or as e-mail signatures. More recently, users of Nintendo Wii have been creating 'Mii's' (Nintendo's version of Avatars) to represent the different players.

The simplest way to create an Avatar is to log onto websites which let you design, download and paste the graphics - all in a few minutes. Avatars can be saved by right clicking on the graphic and choosing "save picture as" (and saving like any other regular picture off the Internet) or else by copying and pasting the code (which is automatically generated by the website).


2D Avatars: DoppelMe

One of the most user-friendly freeware Avatar creators I came across is Doppelme.com. It lets you create a basic 2D Avatar and since the picture generated is a .Gif file, it can be uploaded practically anywhere.


Log onto http://doppelme.com/, and sign in the first time you use the website. When you sign in, you will be asked to submit an active e-mail address. After registration, open your e-mail account (the one you used to register) and click on the activation e-mail. Now you are ready to start your Avatar! Choose whether you want your character to be male or female, give it different facial expressions and hair colour and dress him/her up as you fancy. When you are ready, save your changes and copy the picture by right clicking on it and saving it onto your hard disk. Alternatively, copy and paste the code onto your personal website, blog or social networking page.


3D Avatars: Voki

As with everything else, simple 2D (static) Avatars have evolved into animated,
talking graphical representations, again created with incredible simplicity but with amazing end results. One such 3D Avatar creator is Voki. To log in, go to http://voki.com/.

As with DoppelMe, sign in the first time you log onto the website and you will be sent an activation e-mail. Click on the link in the e-mail to start your new Voki.

Upon entering the website, one notices several differences from the previous 2D Avatar-generator: the main difference being, of course, that the graphics are animated! There is a much wider choice of characters to choose from: not just male or female, but even popular animals such as cats or dogs. Simply click on 'Customise Your Character' to start editing your character.

Backgrounds, too, can be either static or animated; and again there is quite an impressive array to choose from. And if the offered selection isn't enough, one can choose to upload a picture from the hard disk to use as a background picture.


Giving A Voice To Your Avatar

Perhaps the best feature of Voki is the ability to give a 'voice' to your character. There are various ways to do this: the simplest being typing the words and clicking on the Text to Speech button (the 'key' icon'). Voki will 'voice out' what you have written (and it lets you choose which character will read it out too). Alternatively, click on the record button (microphone icon) to record a simple .wav file to attach to your character or if you have previously recorded a sound, click on the open button to locate the file on your computer.


Since Voki creates animated Avatars, it is not possible to just copy the graphic; however it lets you copy and paste the code (you can even choose which kind of code you require; be it for Blogger, Wordpress, Hi5, etc). It also lets you share your Voki with friends by sending it in an e-mail link.

For more information about 2D and 3D Avatars, go to :

Friday, January 30, 2009

Audacity

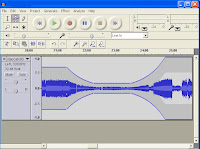
Audacity is a freeware program typically used to record and manipulate audio files. With Audacity you can take a project from start to finish, and the end result can be quite professional sounding too. Its main features are:

  • Recording of live audio;
  • Converting tapes and records into digital recordings;
  • Editing MP3, WAV, AIFF and other sound files;
  • Cut, copy, splice, and mixing of sounds together;
  • Changing the speed or pitch of a recording.

Ready…Steady…Record!

Recording an audio clip with Audacity is as simple as the click of a button. Upon loading, the basic controls can be seen on top of the page. Simply connect a microphone to your PC, click on the Record Button, get recording, and click on the Stop Button to end the recording. You can hear what has been recorded by pressing the Play Button. If you need to record additional segments – for example, if recording a Play or a Radio Programme - just hit the Record Button again and the new recording will be shown in a new channel underneath the original one.

The clips can be moved along the timeline by clicking on the Time Shift Tool and dragging the clip along.

The clips will be saved by default as .aup files, which are the raw Audacity files. In order to be able to hear them on other PCs or MP3 players, click on File > Export as MP3. When exporting to MP3, the program also lets you add tags and info (for example, the genre) which will be embedded into the saved file.


Importing an existing MP3 into Audacity

Apart from recording audio files, one can also import MP3 or WAV files for editing. Click on Project > Import Audio.

The newly imported file can be used in conjunction with a recorded voice file, for example to create a jingle for a podcast.


Audacity Editing Tools

Below is a list of Audacity's editing tools.  The tools are described in chronological order (according to the way they appear on the toolbar).

  • Selection Tool: Click on this icon to select part or all of the audio file
  • Envelope Tool: Lets you change the pitch (loudness) of a selected clip
  • Draw Tool: Zoom in until you can see the individual samples, and change the frequency of the samples
  • Zoom Tool: Zoom in or out of your clip
  • Time Shift Tool: Move clips along the timeline
  • Multi-Tool Mode: Lets you use more than one tool at the same time.

For more information, and to download Audacity, go to:

http://audacity.sourceforge.net/

Sunday, January 25, 2009

Picasa 3

Picasa is a software application for organising, editing and displaying digital photos. It was originally created by Idealab, but in 2004 it was acquired by Google and made available for free download.

The first time you install and load Picasa, it tracks down and organises all the photos in your picture folders. It is important to remember when working with Picasa, that any changes made to the photos within Picasa, will also effect the original photo on your hard drive. However, Picasa creates a backup of your original photo file in a special hidden folder created by the program itself (aptly named ‘Originals’).

Picasa distinguishes between Folders and Albums. Folders in Picasa are basically the original folders containing photos on your PC. Albums on the other hand, are created within Picasa and allow you to work with a specific set of photos while retaining the originals untouched in their folders.

So…What can I do with Picasa?

Editing Pictures: Picasa allows simple yet refined editing on your favourite photos. Simply double click on your desired photo and the program will take you to the Basic Fixes Tab: where you can crop, straighten, re-touch, fix colours and add text to your photos. The Tuning Tab will let you manually fix colours in your photo. The Effects Tab will then let you add special effects, such as B&W, Sepia Tint, Glow, Image Sharpening, etc.

Collages: After you have successful edited your pictures, you can create a ‘Collage’ with the results, either to save as screensaver / desktop or else to print out. Simply click on the ‘Collage’ button, and click on ‘Add’ to add the pictures you wish to use for your collage. There are various collage settings to choose from too – picture borders, picture settings, etc. The collages you create will go into a special album created by Picasa (called ‘Collages’...). Save or print your collage.

Creating a Video with your Pictures: Picasa lets you create a small animated video (if you are familiar with MS Photostory, this is basically the same!). Simply select the photos you wish to work with, and click on the “Create Video” icon. Once again when you save, the video goes into the aptly titled “Videos” album. You can add ‘Title’ slides, which explain what the video is going to be about, and add background music too. It’s a little more limited than MS Photostory in the video-creating stakes, but I’m positive the guys at Google will catch up pretty quickly : ) Also, it has a handy “Upload to YouTube” tool, which lets you upload your creation straight to YouTube.

This article is, of course, just a very slight overview about all the things that can be done with Picasa. For more information about the software, and to download the free updates, simply go to http://picasa.google.com/support.

Friday, January 2, 2009

Using YouTube Videos as a Resource in the Classroom

Most teachers nowadays will be familiar with sites such as YouTube, Metacafe and Dailymotion…That is, sites that offer short videos  for viewing on the PC.  Videos range from educational and instructional videos, to recreational videos, movie clips, etc.

It is relatively easy to search and look for what you want:  just enter a topic, subject, name of movie, song, etc, and hey presto, you will have loads to choose from.  Subject matter include vidoes on topics frequently tackled in the primary classroom, such as The Environment, The Water Cycle, Animals, etc.

There are two ways in which such videos can be accessed and viewed on the computer.  The first is, of course, to look up the video and view it there and then on the computer or laptop.  However, as we all know, the Internet connection in the classroom is not always up to speed…and these kinds of operations need a fast pc or laptop (which we thankfully now have) and a hassle-free connection (which sometimes is, and sometimes is not…).  However there is actually a way of downloading videos or clips onto your pc/laptop and then be able to view them offline (i.e. when one is not connected to the internet).  Here’s how….

How to download videos or clips (so that they can be viewed offline…)

  • First of all you need the page upon which you found the video open.  Go to it and start the video just to be sure it’s the one you want.
  • The video’s URL (Internet Address) will be on your browser’s address bar (i.e., that line on top of the screen where you usually type your URL).  Select it with your mouse, right click on it, and select “copy” to copy the URL.
  • Now open a new window in your Internet browser and enter the following URL: www.keepvid.com
  • On the top of the page, there will be an different address bar with the word “URL” on one side and the "Download" button on the other.  Click on THIS address bar, right click with the mouse button and click on “paste” to paste the video’s URL you have copied earlier.  Then click on the “Download” button.
  • The website will give you 2 options: to either download the video in .flv format or .mp4 format.  It’s a matter of personal taste; however I prefare the .mp4 format.  It’s a bigger format and takes longer to download, however the results are often nicer looking (especially if you intend to show the video on the class monitor connected to the laptop) and are usually easier to run on the laptop generally.
  • So…choose your format and hit “download”.  The website will prompt you to save the file.  Choose a filename and click on the save button.
  • Sit back while your video downloads.  (It may take some time, especially if the video is over 10MB…it depends on your connection, the speed of your PC, etc)

Some important points to consider…

  1. When selecting a video to download, remember to WATCH IT THROUGH,  and that means, from beginning till the end and also THROUGH THE END CREDITS.  I cannot stress this point enough.  Sometimes people disguise tasteless or indeed bits of pornographic material into completely harmless clips.  So please, PLEASE watch the clip carefully before showing it to the kids!
  2. While it is perfectly legal to download videos from YouTube and other similar sites, and to use KeepVid to do so, however be careful when downloading copyrighted movie clips/music clips etc.  Sometimes people put vidoes on YouTube without the permission of the author.  It is ILLEGAL to download copyrighted material from YouTube without the permission of the author.  Be wary of dowloading large chunks of movies from the site – espeicially if the movie’s just come out – its probably there without the author’s permission.

That said, I am sure you will find a lot of helpful resources on YouTube, Metacafe and Dailymotion…Lots of songs, clips, and helpful resources….But as I said…Use Responsibly!

Sites to Remember:

www.keepvid.com

www.youtube.com

www.metacafe.com

www.dailymotion.com