Thursday, June 17, 2010

Wetpaint Wikis (2): Adding Stuff to Your Wiki

When a person creates his or her own personal Wiki, be it for personal or for work use (for example, having a classroom wiki so that both students and parents will be able to access their work from anywhere), it is important to start updating it regularly and keep it interesting for the site visitors. A Wiki can be seen as a sort of template which can be filled up collaboratively; it is alive and dynamic and ever-changing. Unlike a Blog, a Wiki can have several pages, and each page can have its own individual layout. Usually the first page is called 'Home'; that is where you write your introduction - the scope of your Wiki - and then you can have a series of pages linking to that home page.


But before we start talking about editing, a more important question arises: that is, Who is going to be responsible for the edits? Just because you have created a wiki, it doesn't automatically follow that everyone in the world will be able to view or edit it. Public wikis exist of course - the most common example is Wikipedia, which everyone can edit. We, as teachers, deal mostly with young learners, and safety online is often a huge concern of ours. You may want to have a Wiki which everyone can see and join in, but which only yourself and your students (or those whom you invite) can do the edits. You may wish to moderate discussions. Either way, the first thing to do after you create your wiki is to think about Permissions.


Site Settings

Before you start editing, it is important to take a look at your Site Settings. Click on Settings at the top right hand corner of the screen to access your wiki settings. We will go through them one by one in the order in which they appear.


  • Communications: This is where you set your site greetings, messages and notifications. You can also set a profile template for your members to fill in.

  • Templates: This is where the different page templates are. These are similar to MS Word or Powerpoint templates, and you can even customise your own.

  • Name and Logo: Change your site name (logo) and description.

  • Styles: Change appearance or site theme from here - you can choose from a selection of styles to suit the mood of your wiki.

  • Statistics: You may opt to have an analytics widget installed, such as Google Analytics or SiteMeter. These help to keep track of who visits your site.

  • Permissions: Although this is the tab before the last, its one great importance - for this is where you can manage who can view and/or edit your wiki. There are 3 levels of security regarding who will be or not be able to edit your site:
    Everyone, even anonymously - basically your wiki will be open to all, and everyone will be able to post, reply to discussions, comments, etc.
    Anyone who joins your site: There are no anonymous edits allowed, but anyone who joins the site can edit or add pages on your site.
    Only people I invite: There are no anonymous edits allowed, but anyone who joins the site can edit or add pages on your site.There are separate settings for posts and threads. The level of security you use will be determined by what you want to use your wiki for.

  • Backups: Wetpaint allows you to back up the contents of this site by exporting the pages as HTML into a zip file.This process may take a while, especially if this site is large. Backups are important especially if you are writing your information directly onto your Wiki and not, for example typing first into a word processor and then copy and paste your text. REMEMBER: A Wiki is a cloud computing application, and therefore, all the information is stored on servers several hundred miles away from your home. If something happens to that server and you haven't backed up your work, all your data will inevitably be lost - so BACK UP regularly!

Adding Pages


After taking care of the settings, you can start adding pages to your wiki. On the left hand side of your screen you should see the navigation menu. If you haven't added any pages yet, there will be your Home page at the top. Click on Add a new page to have additional pages. You may choose from pre-defined pages (rather like we choose content layout slides in Powerpoint: You can have blank pages, calendar-of-events type of pages, etc. Remember to give a suitable name to your page - short and self-explanatory. Once added, pages can be changed or deleted by clicking on More Tools on the Edit Toolbar.


The Edit Toolbar


As the name suggests, the Edit Toolbar is the place where you will be doing all the editing. After inserting your pages, click on the page you wish to start editing and click on Easy Edit. The Easy Edit Toolbar will pop up, and you can start editing your page by simply clicking on it. You will notice all the familiar icons: Bold, Italics, Underline, Font Name, Spellcheck, etc. Apart from text, your page may contain Photos, Videos, Widgets and/or Content Modules.


Photos and Videos


Click anywhere in your page (whilst in Easy Edit mode) to insert a photo or video. Photos are pretty straight-forward. In the case of videos, you may opt either to upload a video from your PC or else one which resides on a remote server, such as YouTube or Google Video. In the case of YouTube/Google, all you have to do is click on the Video icon, and then on Add by URL OR Embed. Copy the video's Embed Code from the source and click on Add YouTube Video. Once you add your video or picture, you will be able to adjust its size and orientation. In the case of videos, you will only be able to play them when you exit Easy Edit mode.The photos and videos you upload will also be visible in the Photos and Videos pages (accessible from the top menu bar.) The Photos and Videos pages also offer the opportunity to create photo and video albums.You may also opt to add other widgets or videos from other sites other than YouTube or Google - but this, together with the Content Modules, will be dealt with in the next post :)


Now...What Next?


Well, creating your very own Wiki of course! You have more than enough to get you started with your wiki project. You can also access one of my previous posts, an Introduction to Wetpaint Wikis, at http://teachersandcomputers.blogspot.com/2010/04/introducing-wikis-wetpaint-part-1.html, to refresh you memory. Log onto http://wetpaintcentral.com/ to start off. Have fun :)

Wednesday, May 12, 2010

Comic Creation with ToonDoo

Children of all ages love comics - cartoon character strips which usually tell a story, often humourosly, and sometimes with a hidden message or two. Comic strips are often found in newspapers and magazines, and more recently, online. They can be a a way for teachers to convey a message to their students a bit differently, and in turn students can be encouraged to express their thoughts and emotions more freely. Web 2.0 technology offers teachers and students the possiblity to create online, embeddable comic strips and books easily and effectively. One such comic-creation platform is ToonDoo, which can be found on http://www.toondoo.com.

First Look into ToonDoo

After the registration process (neccasary if you want to save your work), and subsequent login with your newly created password, you will be transported onto your ToonDoo homepage. The colourful, cartoony top drop down menus will allow you to do a variety of things, mainly:

Toons Menu: to view your and other people's toons;
Books Menu: to browse through your books and those uploaded by others;
Dooers: to edit your profile;
Tools: to create comic strips and books;
Contests: to enter 'Compleetoons' and 'Toonaments' (ToonDoo style competitons)
Galleries: to view favourite creations
Etc: online help in the form of wikis, blogs and forums.


The home page is quite colourful: with clickable screenshots of the latest and most popular toons uploaded. You will be able to browse through them and get an idea of what can be done with ToonDoo. The presentation below, by Lisa Davidson (previously published on Wauchope IT Wiki), explains the basic features of the application:


Your First Comic Strip

To create your first comic strip, click the light blue Toons menu on the top left hand side of the screen. The first time round your My Toondoo page will naturally be empty. You will see some icons on the top right hand side of the screen. Click on the ToonDoo Maker icon on the top right hand side of the screen (the icon will look like 3 grey boxes, which will change colour when you hover over them with the mouse) to start your first comic strip. Your canvas will load and you will be prompted to choose a page layout first.

To start filling in your comic strip, you can do one of the following things:

1. The easiest way is obviously to use the application's pre-loaded backgrounds and cliparts. There are a good number of pre-loaded graphics however they are obviously somehow limited. To access them, click on the top menu and choose between characters, backgrounds, props, speech bubbles, etc.


2. Alternatively, you may choose to be more creative by either uploading your own pictures from your computer or from the web, or even create your own free-hand drawings. This can be done by clicking on the set of icons at the bottom right hand side of the screen. Clicking on the DoodleR button will enable you to draw free-hand backgrounds or pictures which you can fully move around the screen. The TraitR button will enable you to create characters (or avatars, if you wish) to star in your creation (either cartoony or upload your own picture for a realistic character). Finally, the ImagineR button will enable you to either import pictures from a fixed location or from the web.

my first toondoo

Whilst working away, at the bottom of the screen, you will also notice a variety of tools which are staple of simple doodle makers and paint programs: such as clone, flip or rotate a graphic, send a picture to back/front, etc, which will help you get the effect you desire.


Saving and Sharing your ToonDoo

When you feel that your ToonDoo is ready, you can click on the ToonDoo Main Menu button on the top left hand side of the screen, and click on the save icon (a proverbial blue floppy disk!). You can decide whether your ToonDoo is going to be public, private or to be shared by amongst friends only. You can also choose to have your comic re-doable by others, i.e. let others edit it. Like any Web 2.0 widget, your ToonDoo comic can be embedded into most other websites. To view your embed code, click on the Toons Menu and scroll down to My Toondoos. Select the comic that you wish to embed or share, and click on the Embed icon (<>) to grab the code, or on the email button (envelope icon) to send by email. You can also Tweet it or upload it directly on Facebook too. Alternatevly, print it or save it onto your PC.


From a Comic to a Strip

Once you have created your first comic, you will also be able to create a complete strip, or ToonDoo Book (if you try to create a book without having a comic first, you will be told that you can't). To do so, click on the Books menu on top of the screen and then on My ToonBooks. If you already have some books saved they will show up here: if you want to create a new one, click on the Book Maker icon on the top left hand side of the screen (it should illuminate bright green upon mouse over) and you will be able to drag and drop your comics into the book.


Social Networking

Following other similar online applications, ToonDoo also offers users some social networking traits: the possibility to tag, comment and flag other people's comics, and also the possibility to allow others to re-do (edit) your work. It also allows you to add ToonDoo friends and communicate through private messages (called Bubble Bauble - accessible from the Etc menu). A word of advice: ToonDoo doesn't screen its entries: although there is a great number of educators using the application, it is important for teachers to check out other people's comic strips throughly before sharing with their students.


Sites to Remember:


Thursday, April 22, 2010

Introducing Wikis: Wetpaint (Part 1)


Until not very long ago, if a person or an organisation wanted to create a webpage or website, they generally asked someone else to do it - someone with the knowledge required to create and upload it. One needed to know how to use web-authoring software, perhaps a bit of programming and most importantly, one needed the physical online space to upload a website. This was in the era before we started to talk about Web 2.0 and cloud applications, of which Blogs and Wikis are a prime example.

A blog - or Web-log - is on online diary where people post diary entries about their personal experiences or talk about things that interest them. Blogs became popular because of the ease with which people could upload their posts - usually requiring little more than simple word-processing and e-mailing skills (typing, uploading of photos, attaching files). Popular blog hosting websites include Google's Blogger and Wordpress. Below is a short video which explains in simple layman's terms what a blog is all about:


Another popular and relatively easy way of publishing online material is through the use of Wikis. A Wiki is similar to a Blog in terms of accessability and usability, however it encompasses much, much more. For starters, whilst Blogs are usually made up of one 'page', where a person uploads his or her own personal 'diary' (with the posts appearing one after the other in chronological order), Wikis are usually more complex and are made up of many pages and sub-pages. Furthermore, Blogs are inteded to be used as online diaries, usually maintained by one or a very selective group of people. On the other hand, Wikis are not inteded to be led by just one individual; they have a much greater emphais on collaboration and are regarded as a social interaction and networking tool. The popular online encyclopedia Wikipedia is a prime example of a Wiki in practice: thousands of collaborators from all over the world have joined the site and collaborate regularly on articles to create this vast web-based, collaborative, multilingual encyclopedia project. Perhaps two of the most popular Wiki sites (especially with Educators) are Wikispaces and Wetpaint. Both sites provide free, online hosting and allow users to create simple websites in a matter of minutes. Today I am going to take a look at the basic features of Wetpaint Wikis: below is a short video which gives an overview of what can be done with it:


Wetpaint: Creating an Account

Like with any other online service, the first thing to do is create an account: go to http://www.wetpaintcentral.com/, click on the large green GO! icon and sign up (if its the first time you access the site) or Sign In if you already have an account. You can also opt to sign in with your Facebook, Twitter or Live account. Once your Wetpaint account is activated, you will be able to register and sign in not only on your own Wiki (which you can create from Wetpaint homepage) but also sign in to other public or private wikis (one to which you have been invited to). After creating your username or signing in, all you have to do to create your wiki is go to Wetpaint Homepage (http://wetpaint.com), enter a site name on Name Your Site, enter your chosen URL on Choose URL, and you are ready to create your own website in minutes.


Basic Features and Navigation

Upon loading, your Wetpaint site should look something like this:


You will notice your Site Name on the header on top; and a list of menus at the bottom of this header. This is where you can make changes to your wiki. Below is a list of the menus and what they do:
  • Home: This will take you back to your Home page (easy!) To add additional pages to your wiki, you must click on Add a new page on the top left hand side sidebar.
  • Discussions: This is where you post, reply to and follow discussion. To start a new discussion - Post Thread.
  • Photos and Videos: This is where you can upload photos and videos. Also, any videos or photos uploaded anywhere on the site will be available for viewing here as well. Photos can be grouped intogalleries; videos into Collections.
  • Updates: A summary of all the updates performed and by whom. Very very useful when doing a collborative job!
  • To-dos: Quite simply, a to-do list required for the page. If you want someone to do a particular edit, make sure to post a to-do on the page.
  • Droplets: These are basically widgets that you can add to your favourite social networking site or aggregator, so that you will be able to follow your wiki's updates more easily.
  • Members: A summary of the members of the wiki, with a list of page edits performed as well. By clicking on he member's names you can add them as friends and send them private messages.
  • My Profile: Change your profile details, view messages, compliments, manage your account.
  • Promote: Get tips on how to improve traffic on your site
  • Settings: Last, but most certainly not least, this is the place to change your site settings: from layouts, to templetes, to privacy settings and who can access and edit your site.

Inviting Collaborators

The Scope of having a Wiki is not to build it yourself, but to have collaborators who together work to create a common website. At a basic level, one can have three types of Wikis: A wiki which everyone can edit, even unonimously (100% public); a wiki which only members can edit; or a 100% private wiki, which members may only join by private invitation from an administrator. In the case of private wikis, there is also the added advantage of it being relatively ad-free. Unfortunately at the time of writing this post, the invitation feature for private sites is temporaly disabled; therefore to invite people to join your site, temporarily put the site as "public", share the site's URL with your collaborators, and ask them to click on the Sign Up icon at the top right hand corner of the screen. As soon as everyone has joined, the administrator can put the site back on Private.

In this first part we have only just touched on the basic features of Wetpaint WIkis: What they are, how to create them, and how to invite collaborators. The second part will include more information on how to build up your wiki by adding pages and widgets. Stay tuned :)

Sites to remember:


Monday, March 1, 2010

Sketchfu

Project work in the early years often involves children expressing themselves through pictures and drawings rather than through prose. Students may be asked to collaborate together on a particular drawing, and send it to their partners in another school or indeed another country, so that they (their partners) may also be able to work on it. In such cases, conventional paint packages such as TuxPaint and KidPix may not be altogether adequate. Enter Sketchfu, the online collaborative sketch/doodle maker, which makes collaboration not only possible but user friendly and fun, even for the youngest of learners. Sketchfu is an online (cloud) application, and can be found online on http://sketchfu.com.


Getting Started

Upon loading, you will be prompted either to Sign In or to Create a New account (always recommended to be able to work more efficiently). Upon logging in, you will be transported to your Sketchfu Home Page, where your latest activity, and the activity of your friends, will be displayed. (In true Web 2.0 fashion, Sketchfu allows you to add your friends and collegues as 'online buddies' to make sharing of drawings even easier). From the menu at the top right hand side of the screen, you can also access your Profile (to view your drawings and drawing comments), browse other people's drawings (Browse Drawings), look into other people's Profiles (Browse People) or just start drawing by clicking on Draw.

Start Sketching

To start your drawing simply click on Draw at the top right hand side of the screen. You will be presented with a canvas, around which are a few simple commands: just choose the colour and size of your brush, and you will be able to start your masterpiece in no time! To help younger students, there is a variety of wide tipped brushes to choose from. There is no conventional Eraser button found in similar paint packages; however there is an Undo button. When you are done simply click on Publish (at bottom right hand side of the canvas) in order to save your drawing online. (You can also give your drawing a name; otherwise it will be given an automatically generated number from Sketchfu).


Stop and Replay...

An amazing feature of Sketchfu, which the children like immensly, is the ability to replay their drawing after they are done - as if one is watching a movie of the drawing being made. It is as if an invisible hand is going through the motions and magically building a drawing. The speed of the animation in itself can be regulated by clicking on arrows on either side of the Speed button. Unfortunately the actual animation cannot be embedded in a Blog or Website, but the children can watch it many times over on Sketchfu.com.

Sharing your Creation

Sketchfu allows users to share drawings with one anther, so that another user may be able to add other details to the drawings without having to send complicated e-mails with attachments to and fro each other. Users can also comment on each others' drawings or write instructions to each other within the Sketchfu internal messaging system.

To share a drawing, simply click on the Save button on the right hand side of the screen (opposite the canvas), and then click on e-mail it to send to a collaborator. Note that, before you e-mail it to someone else, you will be able to lock the drawing and thus preventing other people from actually adding anything to the drawing (by clicking on Don't allow others to add to this drawing). You may also share it on Facebook, Blogger, and other online platforms by grabbing the embed code and pasting it on your favourite platform (sadly, you would be pasting the actual drawing, not the animation that goes with it).

When you send an e-mail to a collaborator to view the drawing, he or she will receive an e-mail notification to be able to view or edit your drawing (according to the permissions issued with the e-mail - see above) and once again he or she will be able to send it back to you for editing. It is also easier, for collaboration purposes, if the partners involved are added as 'Friends' on the Sketchfu platform.


A Final Note....

Sketchfu is monitored by the Sketchfu Squad, and any anomalies can be reported directly to them by clicking on their profile which can be found at http://sketchfu.com/profile/FU_MOD_SQUAD. Recently, Andrew and Matt, the creators of Sketchfu, have also released another version of this online sketch maker called Muzy, aimed at more serious artists or perhaps older students, with a bigger canvas, eraser button, collage layers and better brush tools. Muzy can be accessed from the Sketchfu home page or by going directly to http://muzy.com.

Sites to remember:

Report problems in Sketchfu: http://sketchfu.com/profile/FU_MOD_SQUAD
Muzy (for older students): http://muzy.com

Tuesday, February 2, 2010

Glogster: Poster Yourself!

We have all heard of, seen and read Blogs - you are reading one right now! - and Blogging has become a fast hobby for many. You might have a favourite Blog which you like browsing through regularly, or you might have even tried your hand at Blogging yourself. Now there is a new way in which to express yourself: Glogging, as in Glogster - Poster Yourself!

Glogster is a digital poster creator, and allows expression of opinions, feelings and ideas, in a way that wouldn't be possible with the use of mere words. Rather like Blogs, it allows users to use an online medium in order to communicate with the outside world - but instead of text, users use graphical representations, photos, audio and videos to reach their audiences.

Getting Started

Glogster can be accessed at http://glogster.com. As always with this kind of online application, registration is always recommended in order to reap the full user benefits. After registration, click on the pink Log In icon on the top right hand side of the screen and you will be transported to your Glogster Profile. Here, you will be able to edit your profile details, access your own and other people's Public Glogs (because Glogs can be either Private or Public), and read your internal Glogster e-mail. You may also add other Glogster-using friends as buddies, and thus create a small, closed community of friends with whom to create and share Glogs. To start creating your Glog, click on My Desktop and Create a New Glog.

Your First Glog

When you click on Create a New Glog, a random, nearly-bare Glog will pop up on the screen. Each element of the Glog - the background, photos, titles, videos etc - can be edited by the user. The icons on the top left hand side of the screen - Upload and Link - enable one to either upload a picture, video or sound file, or add a link to an existing resource on the web. The uploaded resources will not be automatically be visible on the Glog; they will be stored in its library for later use.


Personalising Your Glog

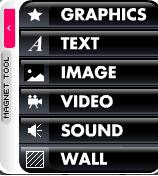
Once you have uploaded your resources, you can click on the floating (black) menu on the left hand side of the screen. This menu will enable you to either use your own uploaded resources or Glogster's ready made ones.

Graphics: By clicking on the Graphics tab, you will gain access to Glogster's graphics library which can be used in your Glog. The images can be manipulated to suit your Glog's needs.
Text: By clicking on the Text tab, you will be able to insert and edit text in your Glog.
Images: The previously uploaded images will be visible here, and you will be able to drag and drop them to your blog.
Videos: Allows you to embed Videos from SchoolTube. Alternatively, upload and embed your own video (Max file size: 100MB).
Sounds: Allows uploading of sound files from your computer or from online sources,
Wall: Enables you to change the background of the Glog. You can choose from Glogster's Gallery or upload your own.

Uploading and Sharing your Glog

Once your Glog is finalised, it will be ready to be published and shared with your friends or with the rest of the world. On the bottom right hand side of the screen there are two pink icons: Preview to see your Glog prior to publication; and Save and Publish to publish and share your Glog. From here you will be able to change the Glog's name, add Tags, Categories and make it Public (for viewing by anyone who accesses the site) or Private (for a selected group of friends only). Upon saving, you will also be able to post your Glog on your favourite Social Networking site or Blog - such as Facebook, MySpace, Wordpress or Blogger Blogs.


To start Glogging, simply log on to http://glogster.com. Go on...Poster Yourself ! :)