We have all heard of, seen and read Blogs - you are reading one right now! - and Blogging has become a fast hobby for many. You might have a favourite Blog which you like browsing through regularly, or you might have even tried your hand at Blogging yourself. Now there is a new way in which to express yourself: Glogging, as in Glogster - Poster Yourself!
When you click on Create a New Glog, a random, nearly-bare Glog will pop up on the screen. Each element of the Glog - the background, photos, titles, videos etc - can be edited by the user. The icons on the top left hand side of the screen - Upload and Link - enable one to either upload a picture, video or sound file, or add a link to an existing resource on the web. The uploaded resources will not be automatically be visible on the Glog; they will be stored in its library for later use.
Glogster is a digital poster creator, and allows expression of opinions, feelings and ideas, in a way that wouldn't be possible with the use of mere words. Rather like Blogs, it allows users to use an online medium in order to communicate with the outside world - but instead of text, users use graphical representations, photos, audio and videos to reach their audiences.
Getting Started
Glogster can be accessed at http://glogster.com. As always with this kind of online application, registration is always recommended in order to reap the full user benefits. After registration, click on the pink Log In icon on the top right hand side of the screen and you will be transported to your Glogster Profile. Here, you will be able to edit your profile details, access your own and other people's Public Glogs (because Glogs can be either Private or Public), and read your internal Glogster e-mail. You may also add other Glogster-using friends as buddies, and thus create a small, closed community of friends with whom to create and share Glogs. To start creating your Glog, click on My Desktop and Create a New Glog.
Your First Glog

Personalising Your Glog
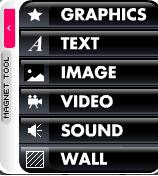

Once you have uploaded your resources, you can click on the floating (black) menu on the left hand side of the screen. This menu will enable you to either use your own uploaded resources or Glogster's ready made ones.
Graphics: By clicking on the Graphics tab, you will gain access to Glogster's graphics library which can be used in your Glog. The images can be manipulated to suit your Glog's needs.
Text: By clicking on the Text tab, you will be able to insert and edit text in your Glog.
Images: The previously uploaded images will be visible here, and you will be able to drag and drop them to your blog.
Videos: Allows you to embed Videos from SchoolTube. Alternatively, upload and embed your own video (Max file size: 100MB).
Sounds: Allows uploading of sound files from your computer or from online sources,
Wall: Enables you to change the background of the Glog. You can choose from Glogster's Gallery or upload your own.
Uploading and Sharing your Glog
Once your Glog is finalised, it will be ready to be published and shared with your friends or with the rest of the world. On the bottom right hand side of the screen there are two pink icons: Preview to see your Glog prior to publication; and Save and Publish to publish and share your Glog. From here you will be able to change the Glog's name, add Tags, Categories and make it Public (for viewing by anyone who accesses the site) or Private (for a selected group of friends only). Upon saving, you will also be able to post your Glog on your favourite Social Networking site or Blog - such as Facebook, MySpace, Wordpress or Blogger Blogs.
To start Glogging, simply log on to http://glogster.com. Go on...Poster Yourself ! :)