Showing posts with label Software Reviews. Show all posts

Friday, January 8, 2010

World of Tux

Many of you might have heard of Tux Paint, a free, open source, bitmap graphics editor. In a few words, it is s simple paint/drawing program, available for free download from its creators. The term open source also means that the software's code is also freely available for users to develop.

Tux Paint's simple interface and bright colours has captured the attention of children and teachers alike. Apart from Tux Paint, two other programs are available for free download from the same developers: Tux of Math Command and Tux Typing. The former is a simple arcade-style game for learning Mathematics; the latter is a typing tutor for children.

The First Step: Tux Paint

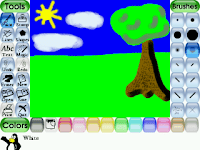
Tux Paint has been previously pre-installed on both the teachers' laptops and the classroom desktops; hence, it is already available for both the teacher and the students alike. Upon loading the software (which can be run either as full-screen or windowed), the canvas will load up, with the Tools on the left hand side, the Actions on the right hand side, and the Colours at the bottom of the screen. The Drawing Tools available include:

Paint: For free-hand drawing. One can also choose the size and shape of the brush stroke from
the Actions on the right hand side of the screen, or the brush colour from the bottom.
Stamps: Ready-made stamps can also be inserted by clicking on the stamps icon on the left, and then scroll amongst the different stamps that appear on the right. The stamps can be made to look bigger or smaller by clicking on the size bars, just underneath the pictures on the right.
Lines: To draw straight lines. The sizes can be chosen from the right.
Shapes: Select this tool to create shapes (solid or empty shapes can be selected from the right).
ABC Text: Allows one to type letters on the keyboard, which appear directly on the canvas (fonts can be chosen from the right).
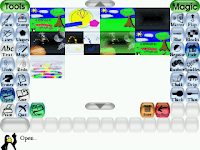
Magic: A special effects wand, to enhance and embellish existing drawings. The different options can be chosen from the right hand side, and include special effects such as creating smudges, waves, TV effects, mirror images, etc.
New: Opens a new canvas to work upon.
Undo and Redo: Undo/Redo actions.
Eraser: Rubber Tool.
Save: Saves current canvas.
Open: Opens a previously saved canvas.
Print: Prints your current canvas.
Quit: Quits the program.

Tux Paint, and additional Tux Paint Stamps, can be downloaded freely from http://www.tuxpaint.org/download/.

Next Step: Tux Typing

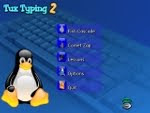
After the students have started gaining more eye to hand co-ordination and mouse skills, it will be time to pass onto some keyboard skills with the use of Tux Typing. Tux Typing is a graded typing tutor, especially
created for young children. Upon loading, you will be greeted with a choice of 3 games: Fish Cascade, Comet Zap and Lesson.

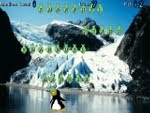
Fish Cascade: The Penguins are hungry! Hungry for letters and for words....Choose a level (easy, medium and hard) and choose the type of letters or words that are falling down from the sky - they can be single letters, simple or long words, or specific words such as names of colours, animals, etc. As soon as the letters appear on the screen, hit the letters on the keyboard to complete the words - and feed the Penguins at the bottom of the screen.

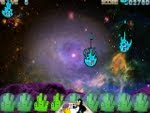
Comet Zap: Comets are falling from the sky, and you have to prevent them from hitting the Penguins! Depending on the level chosen (Space Cadet, Pilot, Ace or Commander), the comets will rain down with varying speed and hit the poor Penguins, unless you hit the relevant key on the keyboard and save the day. Once again, one can choose between just having falling letters or whole words for older students.

Lessons: The Lessons are simple keyboard drills for children, once again, with varying degrees of difficulty. There are 43 lessons in total.

Apart from these three different games, one can also, from the Options in the main menu, change the word lists, setup languages, etc. Tux Typing can be downloaded from http://tux4kids.alioth.debian.org/tuxtype/download.php.

Last Stop: Tux of Math Command

Last but most certainly not least, in the Tux saga, is Tux of Math Command, which is aimed at slightly older students (at Primary Level) and offers a variety of arcade-style maths games for teaching of Mathematics. Play can either be
in One Player or Two Player Mode (the latter offers a chance for collaboration between players). The games all center around the same main objective: that the students are given simple training in number works, starting from basic number recognition to more advanced sums (addition of two 2-digit numbers). A number, or a sum (depending on the level chosen) will appear on the screen, and the children must click on the correct number on the screen and press the space bar to activate their answer.

Being open-source, Tux of Math also has the facility to allow the more advanced users to edit the sums and number patterns and create customised games for their students. For more help on editing the games, and for downloading the game, go to http://tux4kids.alioth.debian.org/tuxmath/download.php.

These three applications are all freeware and open-source (and hence, open for development for the more advanced users) and are available for download on the website http://tux4kids.alioth.debian.org/. Specific developer information, and additional information on Tux Paint (including downloading of additional stamps) can be found on http://www.tuxpaint.org/.

Sunday, April 19, 2009

Using YouTube Videos (Part 2) : Extracting Audio Files


One of the very first posts of this Blog described how we could download YouTube Videos from the Internet and embed them in our everyday lessons in the classroom. I explained in detail how this could be done by using the popular video-downloading site, Keepvid.com (Using YouTube Videos as a Resource in the Classroom). Sometimes though, we might come across a video with a really good soundtrack or commentary, and we would like to use just that, the audio; perhaps to add special effects to an Audacity Project or for quizzing our students in class. Today I am going to focus on how we can extract Audio Files from these downloaded videos (and from other AVI - MP4 files in general).


Extracting Audio Files from Downloaded Videos

To extract audio from a video which is already on your PC, all you require is a simple audio extraction program. There are various freeware and shareware audio extraction applications available for downloading off the Internet, and they are relatively simple to use (just open the video file and the program does the rest). One of my favourites is AoA Audio Extractor, which is available for free download from AoA Media. This little application will effectively convert popular video formats - such as MP4s, AVIs, FLVs, WMVs and MOVs into MP3s, WAVs or AC3s. To start extracting audio files, simply click on Add Files on the top right hand corner of the screen. You will be prompted to choose the video file to convert. Click on Open and then choose the file format for conversion (MP3, WAV or AC3). Finally, click on the large round Start button on the bottom right hand corner of the screen, and the application will do the rest. You can download AoA Audio Extractor from the AoA Media site, which can be found at http://www.aoamedia.com/audioextractor.htm.


Extracting Audio Files from Online Videos

If you wish to use a YouTube Video primarily for its audio component, there is no need to download the video using KeepVid. Instead of using KeepVid, use another site called (wait for it...) ListenToYouTube. What this site does (in a similar way to KeepVid actually) is download the video for you, but instead of giving you the video file (FLV or MP4 format), it just presents you with the extracted audio file in MP3 format.


First, log onto YouTube and locate the video you wish to use, and start playing it. On the right hand side of the screen, you will see the video's URL. Copy the URL (by right clicking and selecting copy). Then, open a new window and type in http://listentoyoutube.com/. In the centre of the screen, you will see an empty address bar in which you can enter your video's URL directly from YouTube. Simply paste the URL you had previously copied (right click > Paste) and click on Go. You will see some basic information about the video you are trying to convert - such as Title, File Size, etc - and in a minute or two, the application will start processing the video for you. Depending on the speed of your connection, the online video will be processed and converted into an MP3 file.

Up to this stage, your MP3 is still not down laded, but is it simply residing on ListenToYouTube's servers. To actually save a copy of this file, click on Download MP3 and you will be taken to another page where once again you will be prompted to download your file. Click once again on Download MP3 and a dialog box will open, prompting you to insert a username and select a save location for your file. Click on Save and your MP3 will be saved onto your PC.


Which is the best system to extract audio from video files? The answer is up to you. It rather depends on your preferences and what you wish to use your newly-extracted audio file for. If for example, you wish to use the file as a lesson starter, you might want the audio clip plus the original video file to show to the students later on. Or you might just need some special sound effects to embed into an Audacity Project. Whatever system you use, please remember the usual pros and cons of using material straight off the Internet, especially with regards to copyrighted materials and suitability of content - refer to my previous entry about YouTube videos at:


Sites to remember:


Note: A special thanks goes to my colleague Kevin Grima for pointing out ListenToYouTube.com to me. Thanks Kevin :)

Friday, January 30, 2009

Audacity

Audacity is a freeware program typically used to record and manipulate audio files. With Audacity you can take a project from start to finish, and the end result can be quite professional sounding too. Its main features are:

  • Recording of live audio;
  • Converting tapes and records into digital recordings;
  • Editing MP3, WAV, AIFF and other sound files;
  • Cut, copy, splice, and mixing of sounds together;
  • Changing the speed or pitch of a recording.

Ready…Steady…Record!

Recording an audio clip with Audacity is as simple as the click of a button. Upon loading, the basic controls can be seen on top of the page. Simply connect a microphone to your PC, click on the Record Button, get recording, and click on the Stop Button to end the recording. You can hear what has been recorded by pressing the Play Button. If you need to record additional segments – for example, if recording a Play or a Radio Programme - just hit the Record Button again and the new recording will be shown in a new channel underneath the original one.

The clips can be moved along the timeline by clicking on the Time Shift Tool and dragging the clip along.

The clips will be saved by default as .aup files, which are the raw Audacity files. In order to be able to hear them on other PCs or MP3 players, click on File > Export as MP3. When exporting to MP3, the program also lets you add tags and info (for example, the genre) which will be embedded into the saved file.


Importing an existing MP3 into Audacity

Apart from recording audio files, one can also import MP3 or WAV files for editing. Click on Project > Import Audio.

The newly imported file can be used in conjunction with a recorded voice file, for example to create a jingle for a podcast.


Audacity Editing Tools

Below is a list of Audacity's editing tools.  The tools are described in chronological order (according to the way they appear on the toolbar).

  • Selection Tool: Click on this icon to select part or all of the audio file
  • Envelope Tool: Lets you change the pitch (loudness) of a selected clip
  • Draw Tool: Zoom in until you can see the individual samples, and change the frequency of the samples
  • Zoom Tool: Zoom in or out of your clip
  • Time Shift Tool: Move clips along the timeline
  • Multi-Tool Mode: Lets you use more than one tool at the same time.

For more information, and to download Audacity, go to:

http://audacity.sourceforge.net/

Sunday, January 25, 2009

Picasa 3

Picasa is a software application for organising, editing and displaying digital photos. It was originally created by Idealab, but in 2004 it was acquired by Google and made available for free download.

The first time you install and load Picasa, it tracks down and organises all the photos in your picture folders. It is important to remember when working with Picasa, that any changes made to the photos within Picasa, will also effect the original photo on your hard drive. However, Picasa creates a backup of your original photo file in a special hidden folder created by the program itself (aptly named ‘Originals’).

Picasa distinguishes between Folders and Albums. Folders in Picasa are basically the original folders containing photos on your PC. Albums on the other hand, are created within Picasa and allow you to work with a specific set of photos while retaining the originals untouched in their folders.

So…What can I do with Picasa?

Editing Pictures: Picasa allows simple yet refined editing on your favourite photos. Simply double click on your desired photo and the program will take you to the Basic Fixes Tab: where you can crop, straighten, re-touch, fix colours and add text to your photos. The Tuning Tab will let you manually fix colours in your photo. The Effects Tab will then let you add special effects, such as B&W, Sepia Tint, Glow, Image Sharpening, etc.

Collages: After you have successful edited your pictures, you can create a ‘Collage’ with the results, either to save as screensaver / desktop or else to print out. Simply click on the ‘Collage’ button, and click on ‘Add’ to add the pictures you wish to use for your collage. There are various collage settings to choose from too – picture borders, picture settings, etc. The collages you create will go into a special album created by Picasa (called ‘Collages’...). Save or print your collage.

Creating a Video with your Pictures: Picasa lets you create a small animated video (if you are familiar with MS Photostory, this is basically the same!). Simply select the photos you wish to work with, and click on the “Create Video” icon. Once again when you save, the video goes into the aptly titled “Videos” album. You can add ‘Title’ slides, which explain what the video is going to be about, and add background music too. It’s a little more limited than MS Photostory in the video-creating stakes, but I’m positive the guys at Google will catch up pretty quickly : ) Also, it has a handy “Upload to YouTube” tool, which lets you upload your creation straight to YouTube.

This article is, of course, just a very slight overview about all the things that can be done with Picasa. For more information about the software, and to download the free updates, simply go to http://picasa.google.com/support.